PythonでやるGoogle Sheets API入門 その2
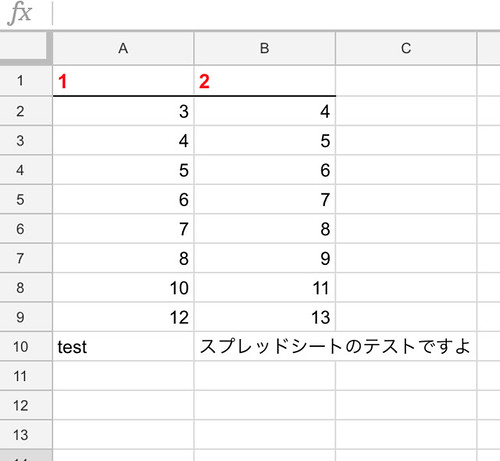
以前書いた記事にアップデートが入ったのでコードを修正した。出来上がるスプレッドシートとかは全く一緒です。
主な変更点は
- google独自のライブラリを使うようになった。
- Oauthのトークンをpickleに保存するように。
独自ライブラリを使うようになって、認証周りのオブジェクトに変更がかかってます。quickstartを読むとだいたいわかる感じです。
以下の内容は過去の記事と同じで、ソースコードだけ更新してます。
Python+ GoogleSheets APIを使ってGoogle Spreadsheetsを編集していく方法まとめていきます。
認証情報の取得
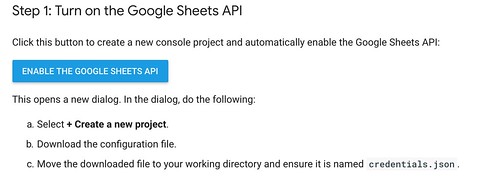
まずは認証情報を作ります。Quick Startを開いて、ENABLE THE GOOGLE SHEETS APIをクリックします。
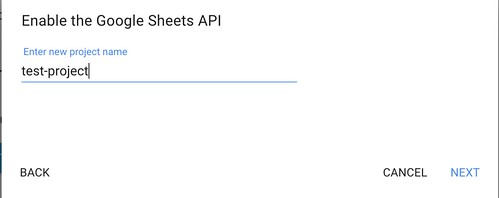
次に適当にprojectを作ります
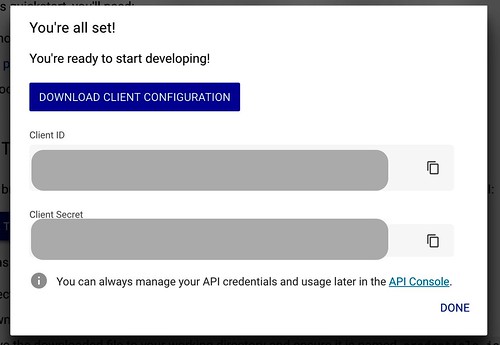
ダウンロードボタンをおして、ローカルに発行された2つのjsonファイルを保存しておきます。
テスト用のスプレッドシートの作成
ブラウザでgoogle driveを開き、スプレッドシートを新規作成します。作成したスプレッドシートのurlの一部がそのままIDになるのでコピーしておきます。
https://docs.google.com/spreadsheets/d/{YOUR_SPEADSHEET_ID}/edit#gid=0
サンプルコードの作成
環境の準備
googleのoauth系のライブラリをpipでインストールします。
pip install --upgrade google-api-python-client google-auth-httplib2 google-auth-oauthlib
サンプルコード
from __future__ import print_function
import pickle
import os.path
from googleapiclient.discovery import build
from google_auth_oauthlib.flow import InstalledAppFlow
from google.auth.transport.requests import Request

SCOPES = 'https://www.googleapis.com/auth/spreadsheets'

print('Input SheetsId:')
sheet_id = input()

creds=None

if os.path.exists('token.pickle'):
    with open('token.pickle', 'rb') as token:
        creds = pickle.load(token)
# If there are no (valid) credentials available, let the user log in.
if not creds or not creds.valid:
    if creds and creds.expired and creds.refresh_token:
        creds.refresh(Request())
    else:
        flow = InstalledAppFlow.from_client_secrets_file('credentials.json', SCOPES)
        creds = flow.run_local_server(port=0)
    # Save the credentials for the next run
    with open('token.pickle', 'wb') as token:
        pickle.dump(creds, token)

service = build('sheets', 'v4', credentials=creds)


spreadsheet_id = sheet_id
sheetname='スプレッドシートのテスト' range_ = sheetname+"!A1:B10"

# シートの作成
requests=[]
requests.append({
    'addSheet':{
        "properties":{
            "title": sheetname,
            "index": "0",
            }

        }
    })

body={'requests':requests}
response=service.spreadsheets().batchUpdate(spreadsheetId=spreadsheet_id, body=body).execute()
sheetid=response['replies'][0]['addSheet']['properties']['sheetId']

#セルに文字列を入れる
range_ = sheetname+"!A1:B10"
v={}
v['range']=range_
v['majorDimension']="ROWS"
v['values']=[
        [1,  2],
        [3,  4],
        [4,  5],
        [5,  6],
        [6,  7],
        [7,  8],
        [8,  9],
        [10, 11],
        [12, 13],
        ['test', 'スプレッドシートのテストですよ'],
        ]
value_input_option = 'USER_ENTERED'
insert_data_option='OVERWRITE'
result = service.spreadsheets().values().update( spreadsheetId=spreadsheet_id, range=range_, valueInputOption=value_input_option, body=v).execute()

#セルのフォーマットを変更する
requests = []
requests.append({
    "updateBorders":{
        "range": {
            "sheetId": sheetid,
            "startRowIndex": 0,
            "endRowIndex": 1,
            "startColumnIndex": 0,
            "endColumnIndex": 2,
            },
        "bottom": {
            "style": "SOLID",
            "width": "1",
            "color": { "red": 0, "green":0, "blue":0 },
            },
        },
    })

requests.append({
    "repeatCell": {
        "range": {
            "sheetId": sheetid,
            "startRowIndex": 0,
            "endRowIndex": 1,
            "startColumnIndex": 0,
            "endColumnIndex": 2,
            },
        "cell": {
            "userEnteredFormat": {
                "horizontalAlignment" : "LEFT",
                "textFormat": {
                    "fontSize": 11,
                    "bold": True,
                    "foregroundColor": {
                        "red": 1.0,
                        },
                    }
                }
            },
        "fields": "userEnteredFormat(textFormat,horizontalAlignment)"
        },
    })
body = { 'requests': requests }
response = service.spreadsheets().batchUpdate(spreadsheetId=spreadsheet_id, body=body).execute()
実行方法
example.pyと同じディレクトリにcredentials.jsonがある状態でexample.pyを実行します。初回にブラウザに飛んでSheetsAPIを利用する許可を求められるので許可をします。
$ ls
credentials.json        example.py

$ python example.py
Input SheetsId:
YOUR_SHEETS_ID
コマンドが動かないとき
A sheet with the name "スプレッドシートのテスト" already exists. Please enter another name.
同じ名前のシートがあると新規に作成できないので、このエラーの時はスプレッドシートにすでにあるシートを削除してください。
サンプルコード解説
認証部分
SCOPES = 'https://www.googleapis.com/auth/spreadsheets'

print('Input SheetsId:')
sheet_id = input()

creds=None

if os.path.exists('token.pickle'):
    with open('token.pickle', 'rb') as token:
        creds = pickle.load(token)
# If there are no (valid) credentials available, let the user log in.
if not creds or not creds.valid:
    if creds and creds.expired and creds.refresh_token:
        creds.refresh(Request())
    else:
        flow = InstalledAppFlow.from_client_secrets_file('credentials.json', SCOPES)
        creds = flow.run_local_server(port=0)
    # Save the credentials for the next run
    with open('token.pickle', 'wb') as token:
        pickle.dump(creds, token)
token.pickleがあればそれを利用し、なければ認証情報を取得、token.pickleに保存します。
シートの作成
spreadsheet_id = sheet_id
sheetname='スプレッドシートのテスト'
range_ = sheetname+"!A1:B10"

# シートの作成
requests=[]
requests.append({
    'addSheet':{
        "properties":{
            "title": sheetname,
            "index": "0",
            }

        }
    })

body={'requests':requests}
response=service.spreadsheets().batchUpdate(spreadsheetId=spreadsheet_id, body=body).execute()
sheetid=response['replies'][0]['addSheet']['properties']['sheetId']
batchUpdateを使って、spreadsheet_idのテスト用に作ったスプレッドシートにシートを追加します。
セルにデータの追加
#セルに文字列を入れる
range_ = sheetname+"!A1:B10"
v={}
v['range']=range_
v['majorDimension']="ROWS"
v['values']=[
        [1,  2],
        [3,  4],
        [4,  5],
        [5,  6],
        [6,  7],
        [7,  8],
        [8,  9],
        [10, 11],
        [12, 13],
        ['test', 'スプレッドシートのテストですよ'],
        ]
value_input_option = 'USER_ENTERED'
insert_data_option='OVERWRITE'
result = service.spreadsheets().values().update( spreadsheetId=spreadsheet_id, range=range_, valueInputOption=value_input_option, body=v).execute()
range_にシートと書き込む範囲を設定して、データをリストで用意して、updateします。
フォーマットの変更
#セルのフォーマットを変更する
requests = []
requests.append({
    "updateBorders":{
        "range": {
            "sheetId": sheetid,
            "startRowIndex": 0,
            "endRowIndex": 1,
            "startColumnIndex": 0,
            "endColumnIndex": 2,
            },
        "bottom": {
            "style": "SOLID",
            "width": "1",
            "color": { "red": 0, "green":0, "blue":0 },
            },
        },
    })

requests.append({
    "repeatCell": {
        "range": {
            "sheetId": sheetid,
            "startRowIndex": 0,
            "endRowIndex": 1,
            "startColumnIndex": 0,
            "endColumnIndex": 2,
            },
        "cell": {
            "userEnteredFormat": {
                "horizontalAlignment" : "LEFT",
                "textFormat": {
                    "fontSize": 11,
                    "bold": True,
                    "foregroundColor": {
                        "red": 1.0,
                        },
                    }
                }
            },
        "fields": "userEnteredFormat(textFormat,horizontalAlignment)"
        },
    })
body = { 'requests': requests }
response = service.spreadsheets().batchUpdate(spreadsheetId=spreadsheet_id, body=body).execute()
フォーマットBasicFormat情報も同様に変更可能です。今回は1行目下に黒のボーダー。1行目の文字を左寄せ、文字色を赤に変更しています。
参考リンクなど
公式のSamplesにある、BasicReading, BasicWriting, BasicFormatを読むとだいたい概要が掴めます。
基本的には、ディクショナリ、リストでデータや、設定値を作成して、update,batchUpdateを利用して更新していく形になります。 一旦なれてしまえば、使いやすくて良いですね。
これで、データをcsvとかに落としてコピペとかを無くしたい。


